

- Home
- Companies
- OnSite FMS, by BENCO Products, Inc.
- Products
- OnSite FMS - FlowBoard Kits for Planter ...
OnSite FMS - FlowBoard Kits for Planter Systems
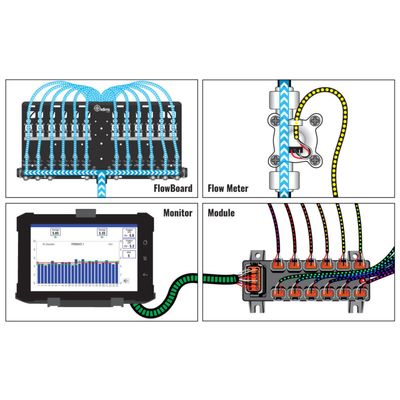
OnSite FMS offers comprehensive FlowBoard Kits that streamline the setup process for planters. These kits include preassembled boards featuring manifolds, flowmeters, OnSite modules, and Bluetooth modules, designed to be installed swiftly. For planters with over 12 rows, multiple FlowBoards are easily connected using the provided Module-to-Module Cable in a daisy chain configuration. This system allows for efficient module detection, minimizing hookup errors. Users can choose between Bluetooth systems, powered through a harness connected to a 12V source, or wired systems where power and signal are routed through a Hitch-to-Module Harness. Additionally, a 7” touchscreen display kit, with accompanying charging cradle, RAM Mount, and Power Harness, facilitates convenient installation in a tractor. The modular manifold design of OnSite FMS+ aligns with various section configurations, making these kits adaptable to different planter setups, although a third-party controller is needed for section control.
OnSite FMS’ standard FlowBoard Kits are the simplest way to get up and running fast.
The FlowBoards come preassembled for easy installation with your manifolds, flowmeters, OnSite modules, and Bluetooth modules already mounted, wired and plumbed together.
Easy Installation in Four Steps
- Bolt the preassembled FlowBoard to the planter
Brackets with U-bolts to mount the FlowBoard to your planter’s toolbar come in the kit. If you already have a bracket from an old red ball system, you may be able to reuse the old bracket. - Attach the lines going out to each row
OnSite FMS+ flow meters use John Guest style 3/8″ push fittings. Just attach your existing lines to the flow meter. - Run power to the board
On a wireless system, you’ll hook on to planter power (the harness is included).
Wired systems get power from the harness running from the hitch. - Install your Monitor in the cab and run power to it
We supply the monitor, RAM brand adjustable mount, monitor cradle, and necessary harnesses with the kit. Connect the cradle wire to the harness and attach the harness to aux power in the cab to power the system.
– On a wireless kit once you have power you are done!
– On a wired kit, you just have to run the harness out of the cab and down to the hitch to meet the FlowBoard harness.
Most of the kit pictured above comes assembled for you to make installation quick and easy. The FlowBoard will have the manifold, flowmeters, Bluetooth module and OnSite module already installed, wired and plumbed together.
If your planter has more than 12 rows, you will have multiple flow boards that must be connected with a Module-to-Module Cable. You will get these in your kit. Just mount the boards and run the Module-to-Module Cable from one to another like a daisy chain. The last FlowBoard in the chain will get a terminator at the end. The system will automatically detect all your modules. You can’t hook them up wrong!
On Bluetooth systems, plug the Bluetooth Power Harness into the other end of the Module Harness. Connect the power harness to any 12V power source on the planter (other than a 12V pump power lead).
On Wired systems, you will conned the other side of the Module Harness to the Hitch-to-Module Harness. Power and signal will be transferred through this cable from the cab, connecting at the hitch.
The included Display Kit comes with your 7″ touchscreen display with charging cradle, a genuine RAM Mount and the Power Harness. To install, just mount the adjustable RAM mount into the tractor, attach the cradle, and drop in your display. The power harness attaches to the cradle and can be run to almost any power source that is convenient. We recommend hooking directly to the battery, but the aux power ports in your cab work great.